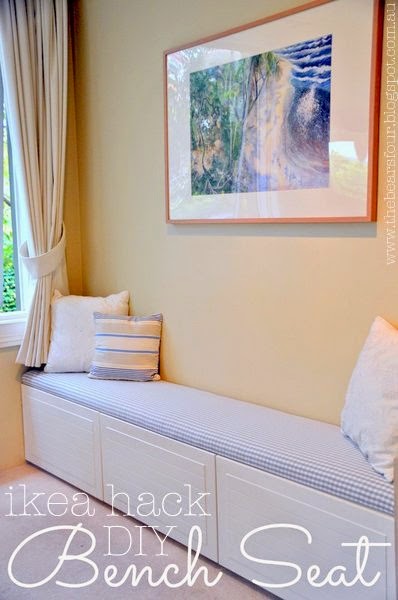
Ok so I have to admit that when I suggested we build our own bench seat I didn't actually think Jeremy would agree to it, but he did! I was super excited and went searching right away for online inspiration, which I found here. After searching we decided the most cost effective and time efficient way to build the bench was to go with ikea kitchen cabinets. Keep reading for step by step instructions and photos. It was pretty easy and turned out great!
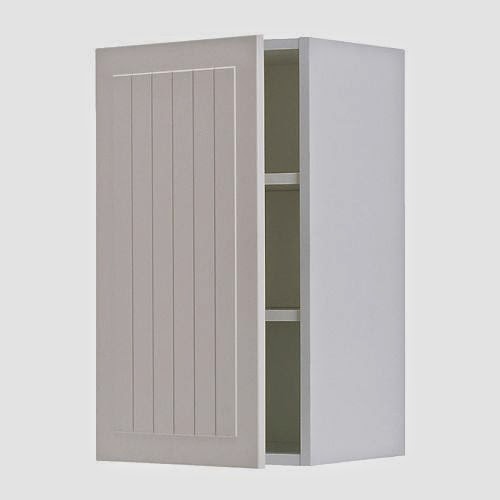
We bought three cabinets measuring 40Hx70Lx37D for a total bench length of 210cm. We wasted no time and started assembling the cabinets as soon as we got home.

We all got into the assembling action and before long we had three built cabinets.
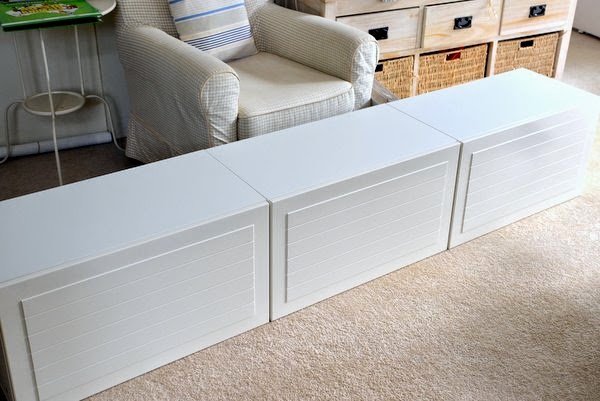
Charlie decided it would be great fun to hide inside them.

Next it was time to screw all of the cabinets together. We decided we wanted the cabinets to open from the bottom so we placed them upside down and screwed the left and right cabinets to the middle one with a screw through both the top and bottom of the inside.
Once the cabinets were all fixed together, we created a toe kick to sit on the bottom of the cabinets, which raises them about 3cm off the floor. Perfect for opening the doors.

We used 3cm thick wood and ran it the full length of the cabinets (210cm) though we brought it about 3cm back from the front for the toe kick. We placed the back length of wood in line with the back of the cabinets. Next we added the side pieces of wood. We used liquid nails and screws to secure the toe kick wood in place. We cut the ends of each piece of wood on a 45 degree angle to give a more finished look, though they didn't exactly line up perfectly, so we used a wood filler.

After the wood filler was dry, I sanded each corner and painted each side of the toe kick that would be visible.

That completed the bench seat base. Next up was the upholstered seat. To make the seat you need MDF, foam, batting, material, staple gun and staples. Lucky for us, Jeremy spotted two discarded long foam cushions on the side of the road in perfect condition. Thank goodness for council cleanup days!

Once again we wasted no time and got straight into pulling out the old upholstery staples and taking the faux leather material off. The foam, batting and MDF were in great condition, we only needed to cut it all down to size. Jeremy used a hand saw to cut off a bit from the long side of each piece and the short side of one of them to fit the top of our bench base. The foam was quite thick and we were a bit worried that it would end up making the bench seat too high, but we decided to go ahead with it as it was because we weren't sure we could get a smooth cut if we sawed the thickness of the foam in half.
I made sure to iron the fabric we chose for the seat, the neutral grey and white check Berta Ruta from Ikea, to make sure it was nice and smooth before laying it down to cover the seat.
Once we were ready for upholstering, we laid the fabric on the floor, then the batting, then the foam and finally the MDF. Next we grabbed the staple gun and got to stapling, making sure to pull the fabric taut as we went.

We borrowed the staple gun from our neighbour and it seriously was from about 40 years ago, so the stapling wasn't super quick because every fifth staple would go wonky and the next 4 staples after that, but we got there in the end.
There are lots of ways to finish off the corners, but we decided to just do a nice fold.

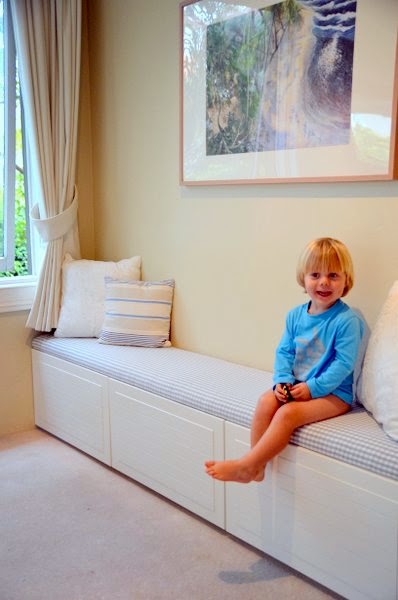
After we finished the upholstery, we turned the bench base right side up and placed the bench seat on top.

There was only one problem...it was way too high :(
Since we plan on using the bench seat as part of our dining set it really needed to be the height of our current dining chairs, which are 47cm high. The bench ended up being 57cm high! We had thought that it would be fine once you sat on it, that it would sink down a bit, but nowhere near enough. We begrudgingly decided to re-do the seat cushion.
First we removed all the staples and then we removed the foam. I marked out where the halfway mark was all around the foam and Jeremy cut the foam in half very slowly with the hand saw. By reducing the thickness of the foam by half, the overall height of the bench was massively improved. After cutting it, we went through the above upholstery steps again until we FINALLY had a finished bench seat!
Lesson learned, always take a bit more time and make it exact the first time. It was well worth the time and money though and for those of you considering something similar, here is a cost breakdown:
fabric: $35 (ikea)
MDF, foam, batting: free
cabinets: $170 (ikea)
toe kick wood: $10
wood filler: $8
paint: $1 reduced to clear from Bunnings
Total: $224
I must be on a roll with getting Jeremy to agree to my DIY projects because he has also agreed to help me build this Ana White farmhouse dining table. The only power tool we own is an electric drill, so it shall be very interesting to see how we go with this one!
Fingers crossed that we'll have a post on it soon.
Happy Renovating!
It's awesome!
ReplyDeletethanks Peg :)
DeleteMa ha messo delle zampe sotto?
DeleteAltrimenti le ante quando si aprono strusciano in terra.
Vielen Dank
DeleteLove it, let's see if mine comes out as successfully.
ReplyDeleteLove it, let's see if mine comes out as successfully.
ReplyDeleteThanks! Good luck on yours :)
DeleteCan adults sit on the bench? Does it bear a good amount of load?
ReplyDeleteI am wondering the same thing ?
DeleteI’m really happy to say it was an interesting post to read. I learned new information from your article, you are doing a great job. Keep it up. High Quality Boat Upholstery USA
ReplyDeleteAffordable Boat Upholstery Services in USA
Thanks for sharing, nice post! Post really provice useful information!
ReplyDeleteGiaonhan247 chuyên dịch vụ mua hàng mỹ từ dịch vụ order hàng mỹ hay nhận mua nước hoa pháp từ website nổi tiếng hàng đầu nước Mỹ mua hàng ebay ship về VN uy tín, giá rẻ.
Thank you so much for such an informative piece of information :)
ReplyDeleteIf anyone interested similar one's have a look here
farmhouseall
Thanks